Happy Tuesday!
Lady bugs, welcome to the June Pinterest Challenge Blog Hop, hosted by Erlene at My Pinterventures. The purpose of these Pinterest challenges is to motivate all the participants of this hop (and you, too) to not just pin, but to make it happen! For June, finally finished a collage I’ve been working on for over a year using a bleeding tissue paper technique I learned…guess where? Yuppers, you guessed it, Pinterest!
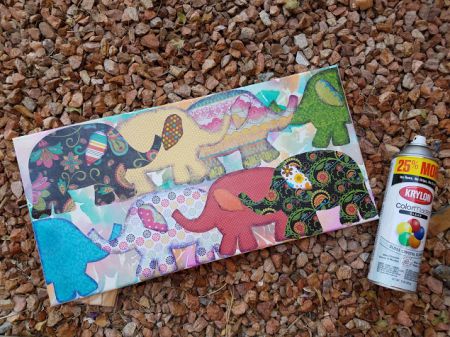
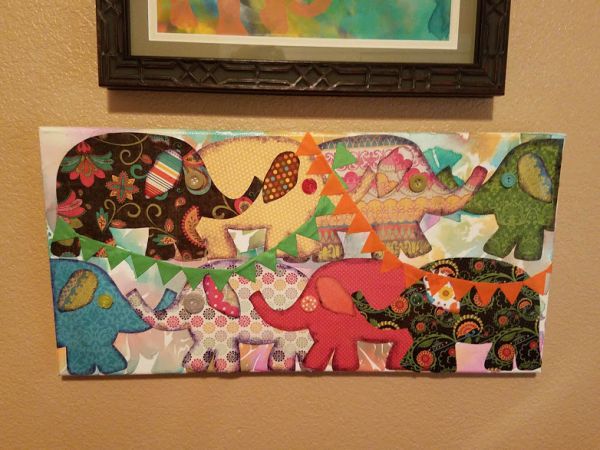
Pinspired Bleeding Tissue Paper Collage
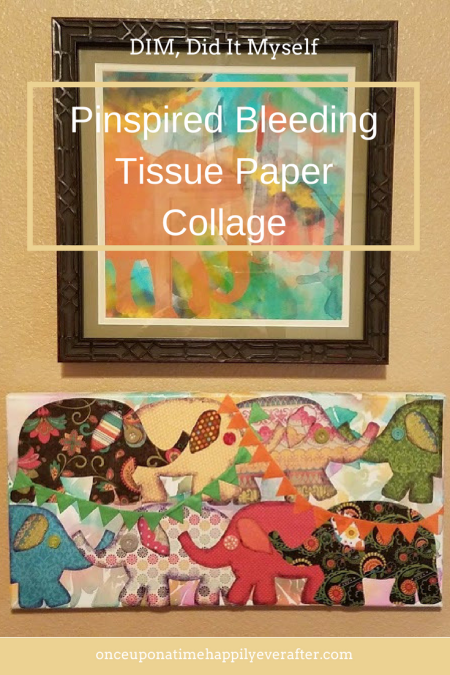
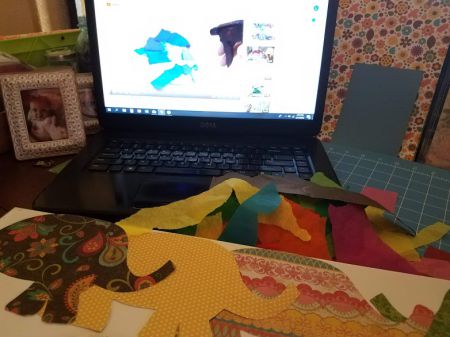
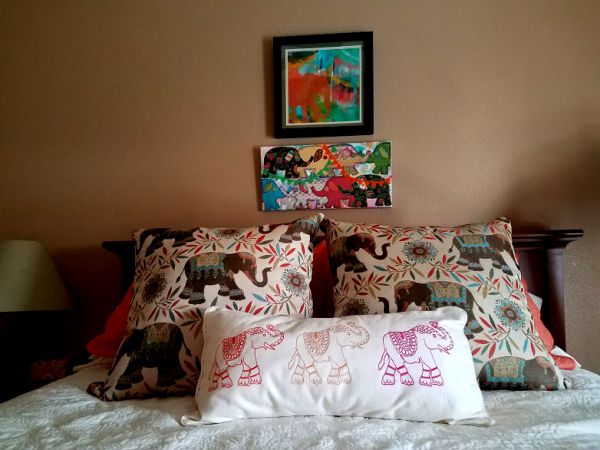
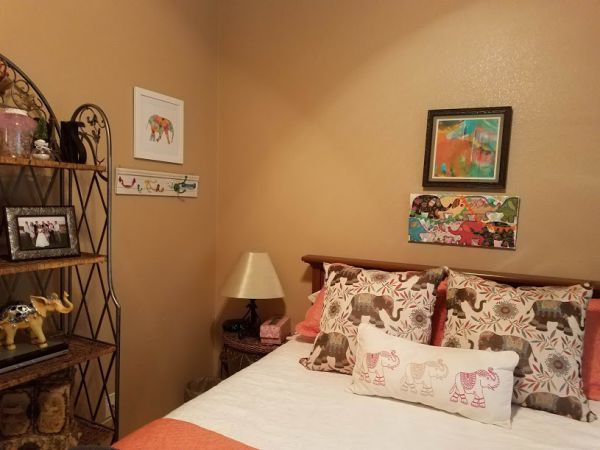
This bleeding tissue paper collage has been hanging fire for over a year. I wanted to create an elephant collage on a bleeding tissue paper background for my elephant-themed guest bedroom. I first thought up this project in the spring of 2015. First mentioned it on the blog as an activity on my 2017 spring bucket list. Yes, that’s 2017…not a typo. It was one of those cases where I knew in my head how I wanted it to look but couldn’t get my hands to make it happen. And, as it turned out, I didn’t realize that all tissue paper isn’t bleeding tissue paper. That’s where Pinterest came in and my Pinterventure began.
I had tried to use regular tissue paper on this collage for my first run but my tissue paper didn’t. Run, that is. It didn’t bleed. What’s a gal to do when at first her project doesn’t work? Hit Pinterest, of course! (Then try, try again) I found this video on Pinterest created by Shaunna at Fantastic Fun and Learning. It clarified for me that there is a special bleeding tissue paper used in art projects. A quick order on Amazon put some of that stuff in my hands in 2 days. Thank you, Prime. Onward, and upward.
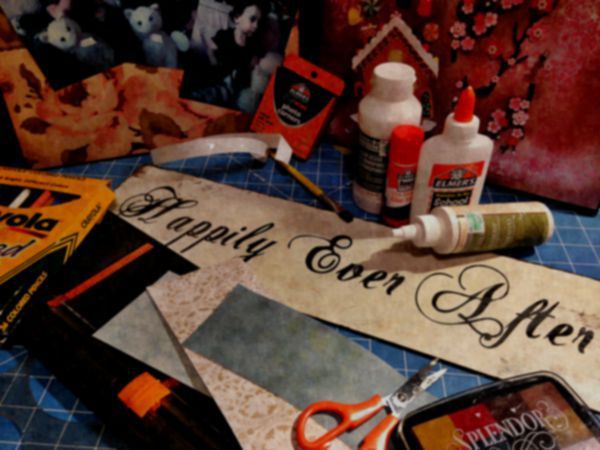
The Supplies
My supply list for this project evolved as I was creating my collage. As I added things, subtracted things to the collage. Here’s what I wound up using:
- canvas
- bleeding tissue paper
- scrapbook paper in several complementary patterns
- elephant pattern to trace, found mine on Pinterest, here, by Ellen Baker at The Long Thread
- ink pad and dabber or Q-tip
- buttons, sequins, small beads
- scissors
- tweezers
- pencil
- small spray bottle filled with water
- spray adhesive
- clear spray-on glaze for craft projects
Directions
- Find an elephant pattern or create your own (or any other animal or character).
- Determine how you want your pattern to lie on the canvas and how many pieces of your pattern you will need.
- Select several patterns of scrapbook paper in complementary colors.

- Trace the pattern onto the scrapbook paper.
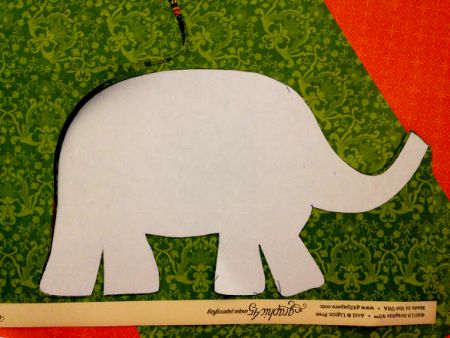
- Cut out the elephants (or the animal of your choosing).
- Arrange them onto the canvas in a pleasing manner and take a photo of your final arrangement.
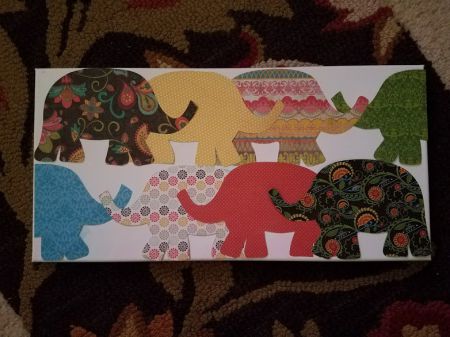
- Remove the elephants from the canvas and set aside.
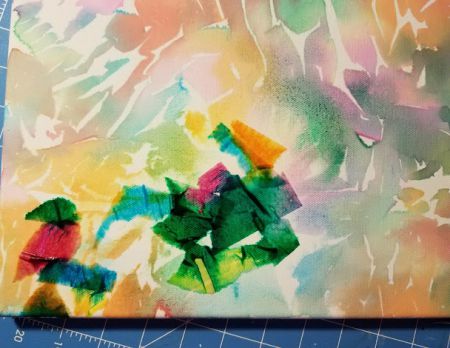
- Select tissue paper colors that coordinate with or complement the colors in your scrapbook paper shapes.
- Tear the tissue paper into different shapes and sizes.
- Arrange the torn pieces of tissue paper onto the canvas creating a good balance of color and white space.
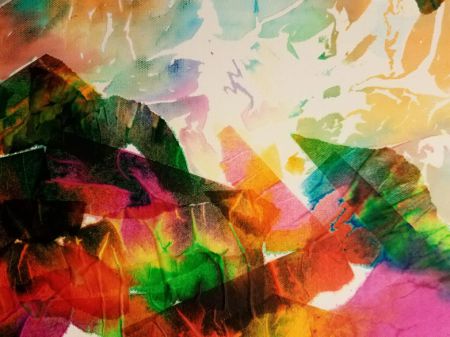
- Keep in mind that when the tissue paper colors bleed into one another, new colors will be created. Using too many colors and too much water will make a muddy brownish-black shade.
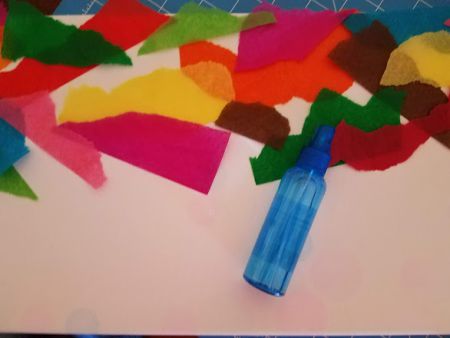
- Lightly spray the tissue paper with water from the spray bottle on one area of the canvas at a time.
- After the color bleeding slows in one area, move to another area and spray those tissue paper pieces.
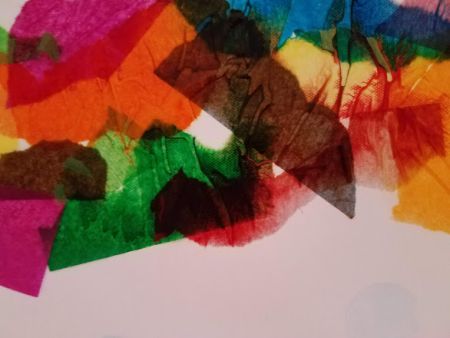
- Fold pieces of tissue paper around the edges of the canvas so they will be dyed, too.
- Once all of the tissue paper pieces have been sprayed, allow the entire canvas to dry 5-10 minutes.
- Pull up the damp tissue paper with tweezers and set aside.
- Evaluate the color areas and white space on the canvas, if there are places where more color or the addition of another color is needed, use a fresh piece of torn tissue and repeat the process above, using a light mist of water.
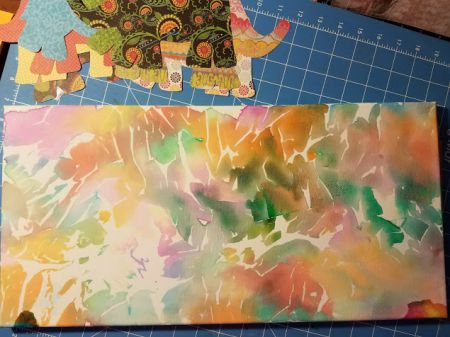
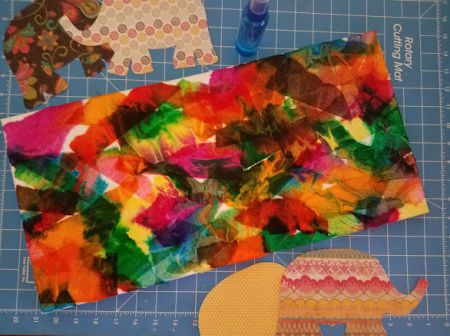
- Once the bleeding tissue paper background looks the way you like it, allow it to dry completely.
- In the meantime, take your ink dabber and lightly dab ink around the edges of your animals to give them an aged look that will help set them apart from the background.

- Consult the photo you took of the arrangement of the scrapbook paper animals and put them in place on the dried canvas background.
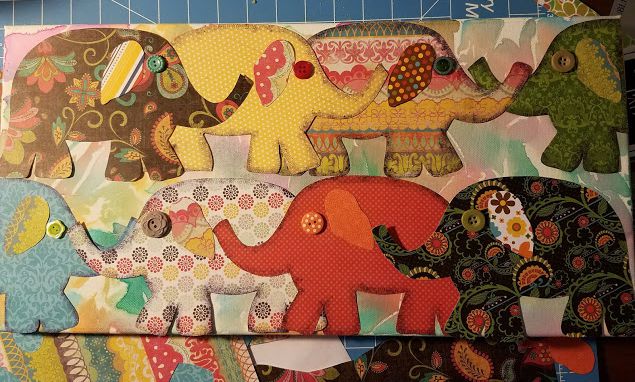
- Trace lightly around the animals with pencil to mark their places, then remove them from the canvas.
- Spread aluminum foil or wax paper on the floor in a space where over-spray from the adhesive won’t damage anything.
- Spray the back of one elephant at a time and add it immediately to the canvas using the pencil lines as a guide for positioning them.
- Allow to dry completely.
- If desired, spray entire canvas with gloss, semi-gloss, or matte protective spray.
- Once the canvas is dry, add details to the animals faces using buttons, sequins, small beads.
Last step is a biggie. Pat yourself on the back for finally finishing a project that you started, if you are ME, 3 years ago! Hang it in the elephant guest bedroom!
Your Turn
Do you Pinterest, my dears? Has Pinterest ever come to your rescue on a project that you were struggling with? Do you still pin or has Pinterest become a passing fancy?
I still pin all the time. And I go back over my pins quite often. Maybe not all of them, but especially my recipes and craft activity pins. If you are a Pinterester, please leave your handle in a comment below so I can follow you. Would love for you to follow me back. You can find me on Pinterest, here.
Would like to invite my crafty blogging buds to join in for July’s Pinterest Challenge. To join next month’s #pinterestchallenge, click here to sign-up ⇒ July Pinterest Challenge.
Now let’s see what other things Pinterest inspired! Head over and visit the other hosts to see what they crafted, cooked, built, or tried!

Erlene – My Pinterventures • Lauren – Mom Home Guide
Debbee – Debbee’s Buzz • Laurie – My Husband Has Too Many Hobbies
Bri – Halfpint Design • Julie – Sum of their Stories
Lisa – Blogghetti • T’onna – Sew Crafty Crochet
Pili – My Sweet Things • Debra – Shoppe No. 5
Roseann – This Autoimmune Life • Terri – Our Good Life
Chelc – Inside The Fox Den • Cherryl – Farm Girl Reformed
Leslie – Once Upon a Time & Happily Ever After
Kelley – Simply Inspired Meals • Joanne – Our Unschooling Journey
Jenny – Cookies Coffee and Crafts • Gail – Purple Hues and Me
Beverly – Across the Boulevard • Habiba – Craftify My Love
Kristie – Teadoddles • Shirley – Intelligent Domestications
Kelli – The Olympic Nest • Lydia – Lydia’s Flexitarian Kitchen
Michelle – Our Crafty Mom • Emily – Domestic Deadline
Thank you, sweet pals o’mine, for visiting today. Chances are that while you are reading this I am still out of town, celebrating Brennyn and Mustafa’s wedding. Will be back home on the 20th and hope to settle into a routine for the rest of the summer. I work so much better with a schedule to keep me straight. Do you? Come back on 06.21.2018 for a peek at my 2018 summer bucket list. And think about linking-up with us to share yours!
Hugs and kisses,

That is SO clever! I love it. You should be so proud of it, it looks fabulous in that room.
Thank you! I hope the guests who stay in my elephant guest room will enjoy my little project.
I love colorful artwork and that tissue paper elephant piece fits right in. I am sure your guests will love staying in that room.
Oh, thank you, sweets!! My downstairs elephant guest room is where my youngest daughter always stays when she visits. I hope she will like the new ‘art’!
I need artwork and this looks VERY fun, Leslie!
Love how the tissue bleed almost looks like tropical/jungle leaves…a fitting background for your elephants. I’m not so great at pattern coordination, but YOU made wonderful choices for a super cut room.
As far as the project time frame…that’s me all over, girl!
Thank you, sweet Em. I struggled so with this silly elephant project. Glad to have it finished and on the wall. Your projects are so much more labor-intensive and time-consuming. Can’t wait to see how the walk turns out!
Cutest elephants ever! I like how you dabbed the ink around the edges of the elephants. The background with the tissue paper looks great. I know how you feel, you make plans and life happens. I’m suppose to be redecorating my daughters room to horses, but I keep getting distracted. Pinning!
Thank you, sweet Jenny, for your kind words. Hope you can finish up your horsie room for you daughter over the summer. I need to buckle down and finish spring cleaning, too! Hope to be home the rest of the summer to get that down. Good luck with your project.
What a fun idea! Your elephant collage turned out beautifully. I always say I’m gonna create something and never do because lazy or it sounds like a good idea at the time or what have you… But we do have some of my photographs hanging in the house, so that makes me happy.
And, yep, I still pin. Most of it is clothing or house ideas though. My name is https://www.pinterest.com/daenelt
What a great idea to hang some of your photos in your home!!! Hope you will rehang them once you get settled in your new home. I had never thought of doing that but might have to follow your good lead. I guess we have vacation photos hanging up and sitting about on table tops but not photos that I have taken in hopes of being artsy!!! Double-checked and I am already following you on Pinterest. Hope you will pin some of your plans for your new home.
Wow! We did a few bleeding tissue paper crafts and I have got to say that our paper did not leave nearly as much color behind. It was very faint by the time it dried. I love the colors and it makes a perfect background for your cute elephants. Pinned.
Thank you for pinning and commenting on my elephant collage. When I used the regular tissue paper (before I knew there was a special bleeding tissue paper), my results were very faint, too. I think if I had left the damp bleeding tissue on my canvas until it completely dried, my colors would really have been vibrant. But I was afraid if the background was too bright it would detract from my elephants. Thank you for stopping by.
I’ve never heard of bleeding tissue paper but now I want some for my crafting stash! Pinning for later!
Hope you will give bleeding tissue paper a try on a craft project in the near future. It was fun to work with. And there are a lot of great tutorials on Pinterest. Thank you for coming by to visit.
Love how you shared the process. I’m not very much into crafts, but I’m intrigued! And I adore the final piece in the elephant room. I’d do one of fish… I use fish a lot in decorating!
Oh, Pat, would love for you to try your hand at a collage with this bleeding tissue paper! A fish theme would be perfect. The tissue paper is fun to work with and so inexpensive that you can have a few trial runs!
Leslie, I had no idea there was special tissue paper for this type of project, I would have made the same initial mistake. Your project turned out fantastic! Pinning.
Thank you, sweet Laurie, for making me feel better about not originally realizing there were two kinds of tissue paper. You should have seen me trying to make regular tissue bleed. It was having none of it!
Never knew about the special bleeding tissue paper either, I sure would have just used regular tissue paper. Good to know! I love the elephant collage you made and your guest room is so fun!
Thank you, Lisa. My youngest daughter usually stays in my elephant room and I think she will appreciate the new ‘art’.
It’s amazing what you can discover on Pinterest! I had never heard of bleeding tissue paper crafts and yours is so adorable! Thanks for sharing! Pinned!
Oh, Gail, Pinterest was a genius invention…does it qualify as an invention? Thank you for pinning my little elephant parade. The bleeding tissue paper is fun to work with. Hope I’ve inspired others to give a go!
Wow! Such a unique and fun DIY project for home decor. I have never heard of bleeding tissue paper and that is why these Pinterest challenges are so fun! Pinning this for later and plan to do a project. It could take a couple years before I get to it though. I totally understand that!!
Thank you, Shirley! My bleeding tissue paper collage took 3 years to complete…partially because I was using the wrong tissue paper!! Ha. Hard to squeeze blood from a turnip or make regular tissue paper bleed! Hope you will give this a go.
Your picture turned out great! I didn’t know there was such a thing as bleeding tissue paper!
Sweet Roseann, I think bleeding tissue paper must be the best kept arts and crafts secret. No one seems to know about it except a few smart gals on Pinterest!! So tickled to be able to share something new to me and to others!!
This is fascinating. I never knew there were different tissue papers. It turned out so pretty.
Thank you Debra! I want to try some other bleeding tissue paper projects now. Maybe use it in making cards?
Wow-it turned out great! So crafty and fun. Enjoy your summer Leslie.
Hey girl!! Thank you for your sweet words. Are you still working? Is it is a good that you are/aren’t? I wish I could find a little part-time job that would pay me really, really well, allow me to dress up, snuggle kids and do something with arts and crafts and books. I hate not having extra money. Do you have time to craft any these days?
I had no idea there was a different in tissue paper! I would have done the same thing. Thank you for saving me from a project failure! This came out really cute. I love elephants.
We are loving elephants, too, Bri! And rabbits. My daughter has a particular passion for bunnies and it has been passed along to her two-year-old daughter. The bleeding tissue paper is lots of fun. Thinking it would be great for card making. Thanks for coming by!
I love this. So darn cute. Love the button eyes.
Thank you, Lysha! I had fun with my bleeding tissue/elephant collage!
This is darling! I love the idea and it would be so fun for craft for kids too. Maybe a shadow silhouette? Thanks for sharing your process and tips!
Yes, Laura, a shadow silhouette would be great with the bleeding tissue paper background. A silhouette of your precious girls!! Let me know if you try it!
Wow! This is amazing! I love it! Pinning!
Thank you, Amy. I had 3 years of fun trying to figure out my elephant collage and the bleeding tissue business!! Kept me busy.
Thank you, sweets!!
I bet you could make some beautiful cards with a bleeding tissue paper background. You make the prettiest things!
What a lovely way to make a background. Your guest room looks great now and honestly, 3 years for a project sounds quite normal to me!
I love your sweet and pretty collage! Cute project.
Thank you, sweet friend!
I’ve heard about bleeding tissue paper and have always wanted to try it in an art project. Your project turned out so cute and has inspired me to order some of this paper. Not sure what I’ll use it for, but I definitely want to make something with it.
Yay, yay, yay!! So glad my little project inspired you to try bleeding tissue paper. I think it would be pretty in card making and Bible journaling, too. I plan to play with it some more soon!
I love this project. It goes so well with your bedroom. Thanks for the tutorial, it really helped me visualize what needs to be done.
Thank you! I am so sad. My elephants are lifting up from the canvas. I need to seal them maybe with a brush on sealant. I think it has been so hot here (21 days over 100*F) that the adhesive just loosened up. Boo!!
Wow, this looks awesome! Isn’t it great to finally finish a project? Pinned!
It was a great feeling to finally finish my elephant project. Now to get back to work on a cross stitch I started for my husband when we were dating. Ha!! Do you see a trend? Thanks for coming by and pinning!